I’m writing this from the perspective of a naive Linux admin so I may not be doing everything right and I certainly don’t address issues such as Zones, ZFS … I just spent a few hours to get some basic services running on an old T2000 box.
Installation
- Downloaded Solaris 11 from Oracle – Text Install Option. I needed to use my Oracle email address and password combination
- Burned the iso to a CD and inserted the CD into the Sun T2000
- Halted the T2000 to the ok prompt and typed: boot cdrom
- I chose option 1 to install Solaris 11 and followed the install answering the questions for network settings, partitioning and user passwords
- After installation and reboot I could log in with my non-privileged user account and subsequently was able to su to root
Services
- svcs – lists all currently installed services
- svcadm enable mysql – Enable a newly installed service
- svcadm restart mysql – Restart the service
Package Management
The Solaris package management IPS is not nearly as developed or comprehensive as the equivalent Gnu/Linux ones (Apt/Yum) but it does make some things a bit easier. For packages unavailable from the Oracle Repos check out the OpenCSW section below:
- pkg refresh – Get the current list of packages from the repos
- pkg list – List all currently installed packages
- pkg search dhcp – Search for packages
- pkg install service/network/ftp – Install a package from the repo
Installing (S) AMP
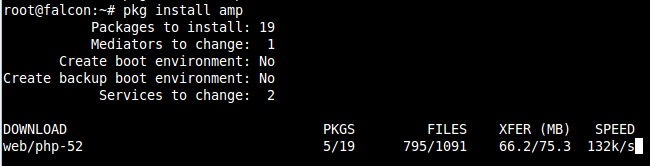
After initial installation I could see that the apache22 package was already installed but I needed to enable the service to get it running (svcadm enable apache22). To install the Apache with MySQL and PHP (AMP) :
- pkg install amp
- svcadm restart apache22 OR svcadm restart http
- svcadm enable mysql
- Create a PHP file under /var/apache2/2.2/htdocs and load it in a web browser
Installing FTP
- pkg install service/network/ftp [may already be installed]
- svcadm enable ftp
- svcs ftp
- Test an ftp connection with an existing user or create a new user with useradd
Configure NTP (Client)
- cd /etc/inet
- cp ntp.client ntp.conf
- chmod 644 ntp.conf
- vi ntp.conf
- Add some server or pool lines
- svcadm enable ntp
- svcadm restart ntp
- svcs ntp
- ntpq -p
Changing the IP Address
- ipadm show-addr
- ipadm delete-addr net0/v4 && ipadm create-addr -T static -a 123.111.123.111/24 net0/v4
- After deleting the IP address you may need to start a new session to the new IP address if using SSH
- ipadm
Package Management with OpenCSW
First install OpenCSW (Open Cashew) and install wget:
- pkgadd -d http://get.opencsw.org/now
- /opt/csw/bin/pkgutil -U
- /opt/csw/bin/pkgutil -l [shows lists of packages installed/managed by CSW)
- /opt/csw/bin/pkgutil -i CSWwget
- /opt/csw/bin/pkgutil -l
- /opt/csw/bin/pkgutil -a [shows list of packages available from OpenCSW]
Now edit root’s $PATH environment variable to include the binaries installed by OpenCSW :
- vi /root/.profile
- export PATH=/usr/bin:/usr/sbin:/opt/csw/bin:/opt/csw/sbin
Installing FreeRadius
- /opt/csw/bin/pkgutil -i CSWfreeradius
- groupadd radiusd
- useradd radiusd
- Edit the files under /opt/csw/etc/raddb especially the bind address in radiusd.conf
- While playing with the configuration files you may need to examine the output in /opt/csw/var/log/radius/radiusd.log and you may also try running the daemon directly with /opt/csw/sbin/radiusd
- When things are running smoothly:
- svcadm disable radius && svcadm enable radius && svcadm restart radius && svcs radius
For get access to #mysql command tools after install amp , execute this.. many problems for one line…
pkg install mysql-55/client